
Apply for a bot
A bot is your verified RCS sender. This is the KYC form that gets it approved: what every field wants, what to have ready, and what happens after you submit.
Open Apply for RCS from the dashboard, or go to
rcs.splashifypro.com/apply-rcs. The form is one page in six sections. Have
everything ready before you start: the form does not load a saved draft back,
so plan to fill it in one sitting.
Owner only
Only the account owner can submit an application. Operators and viewers do not see the form.
Before you start
Gather these first, hunting for them mid-form is what turns twenty minutes into an afternoon:
- GSTIN and registered company name, exactly as they appear on the certificate
- A live website on HTTPS, with working privacy policy, terms and contact pages
- A support phone number and support email that a real person answers
- A logo at 224 × 224 px, under 50 KB, PNG or JPG
- A banner at 1440 × 448 px, under 195 KB, PNG or JPG
- A scan of one of these: your registration certificate, business PAN or CIN, PDF, JPG or PNG, up to 5 MB
Get the images right first
The two image fields have exact pixel dimensions and hard size caps, and they are the most common reason an otherwise finished form cannot be submitted. Resize and compress before you open the form. Anything off-spec is rejected at upload, not at review.
Four categories will not be approved at all
Loans and credit, cryptocurrency, gaming, and betting or gambling are refused on RCS in India regardless of how the application is worded. If that is your traffic, the form is not worth filling in. What is not allowed →
Section 1, Basic details
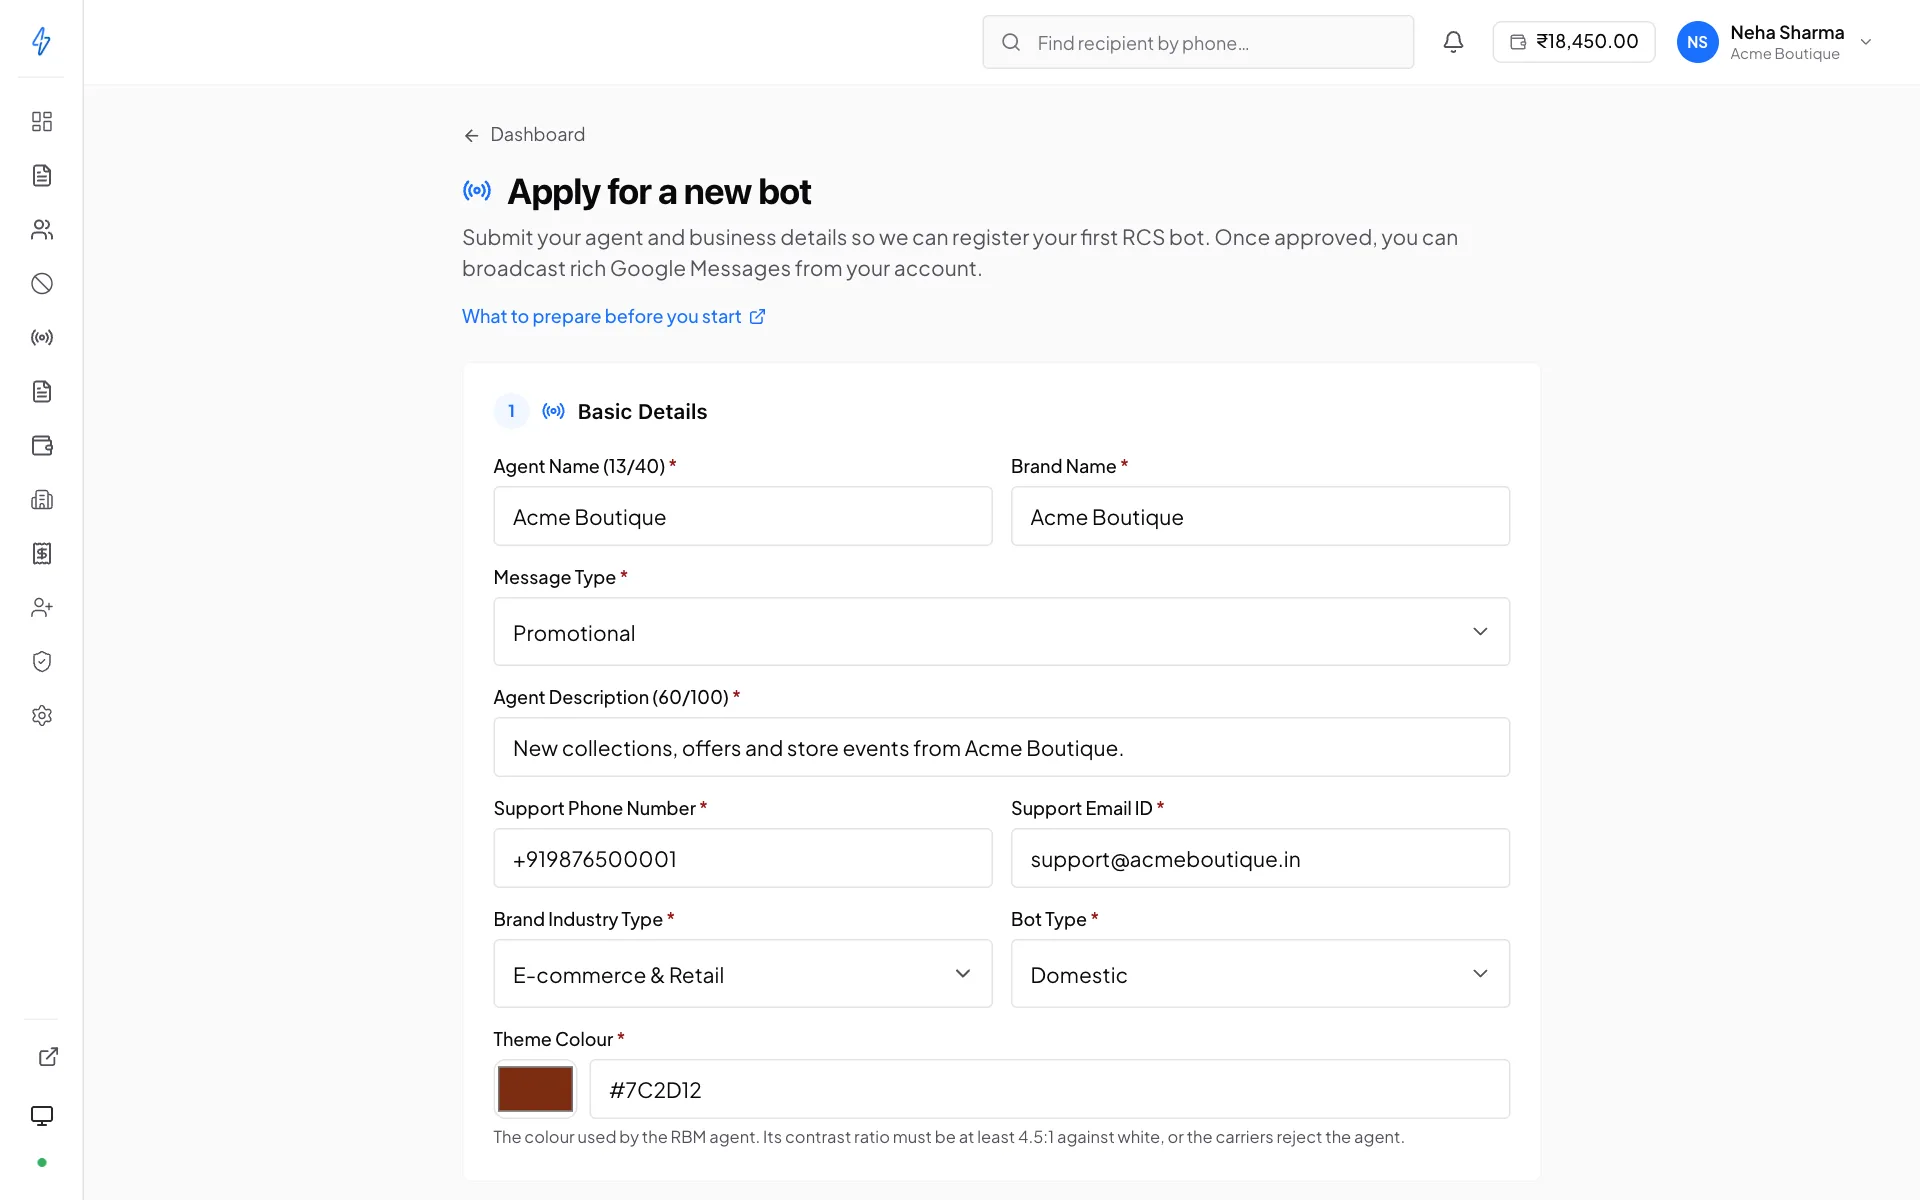
The agent name is hard to change later
It is part of the verified identity, so changing it means another review. Decide it with whoever owns the brand before you submit.
Section 2, Attachments
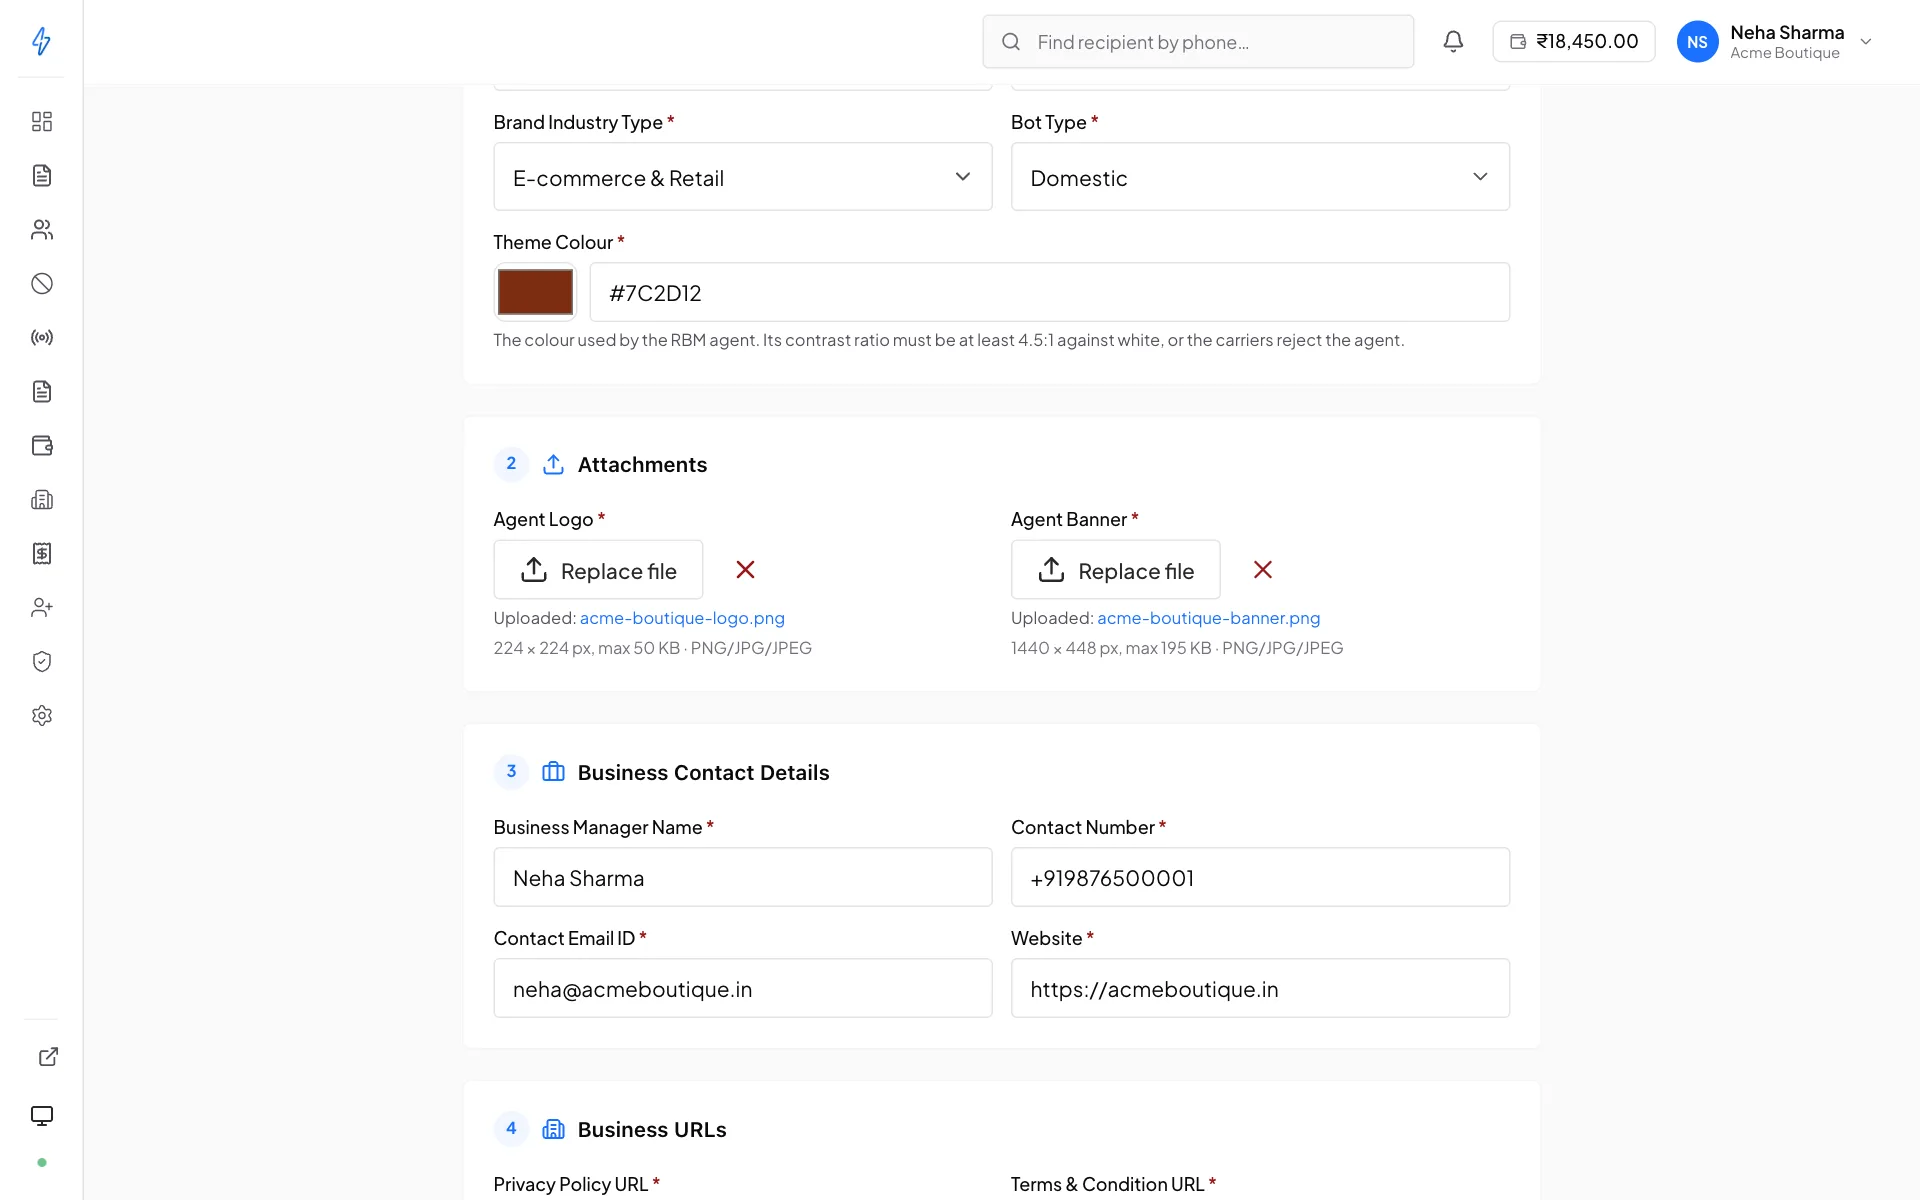
Two images, both required, both with exact specifications.
Press Choose a file for each image. A file over the size limit is refused before it uploads. Once it is in, its name shows under the button. Replace file swaps it for another, and the red cross removes it. There is no box for a link: every image goes through the upload.
The logo is what sits beside every message. The banner is the header of your agent's profile card, which recipients see when they tap your name.
Section 3, Business contact details
Who to contact about the account. These are not shown to recipients, the recipient-facing contacts are the support phone and email in section 1.
Section 4, Business URLs
Three published pages, all HTTPS, all live before you submit.
These are checked by hand
A 404, a page behind a login, or a link to a PDF in a Drive folder will fail review. Open all three in a private window before you submit.
Section 5, Agent verification
Company identity, checked against your documents.
- Registered company name, exactly as on the registration certificate
- Company HQ location
- GSTIN, 15 characters
- Company address
Uniqueness rules
Two fields are unique across all Splashify accounts, to stop one company impersonating another:
- GSTIN
- Brand website
The same account may reuse both across several bots. That is the normal multi-brand case. But if either value is already registered under a different account, the submission is refused:
{
  "success": false,
  "field": "gstin",
  "message": "This GSTIN is already registered under another RCS account. Contact support with proof of ownership if this is incorrect."
}
Comparison is normalised first, so casing and formatting do not create false
mismatches: the GSTIN is upper-cased and trimmed, and the website is
lower-cased with http:// / https:// and any trailing slash stripped.
If your GSTIN really is already taken
It usually means a colleague already started an account. Find them first. If you are certain it is wrong, write to [email protected] with proof of ownership.
Section 6, Documents
Only one is needed. Pick which one you have, then upload it, the same as the images.
Uploads try to fill the form for you
When you upload a document, the panel reads it and offers to fill matching fields, company name, GSTIN, address. Check what it extracted against the document. It is a time-saver, not a source of truth, and a wrong GSTIN that you did not notice is a rejected application a week later.
Save as draft, or submit
Save draft stores a copy of whatever you have filled in with us. A draft does not allocate a bot and does not run the uniqueness check.
Your saved draft opens again the next time you open the form, with a note that says when you saved it. Pick up where you left off, then submit it when you are ready. Discard draft on that note deletes the saved copy: the form starts blank again, or, for a rejected bot you are correcting, goes back to the application as you sent it.
A new bot has one draft, and each rejected bot you correct has its own, so saving one never changes another, or an application you already sent.
Submit for review validates every required field, runs the uniqueness check, allocates a bot, and sends it for review. From that point the form is read-only.
After you submit
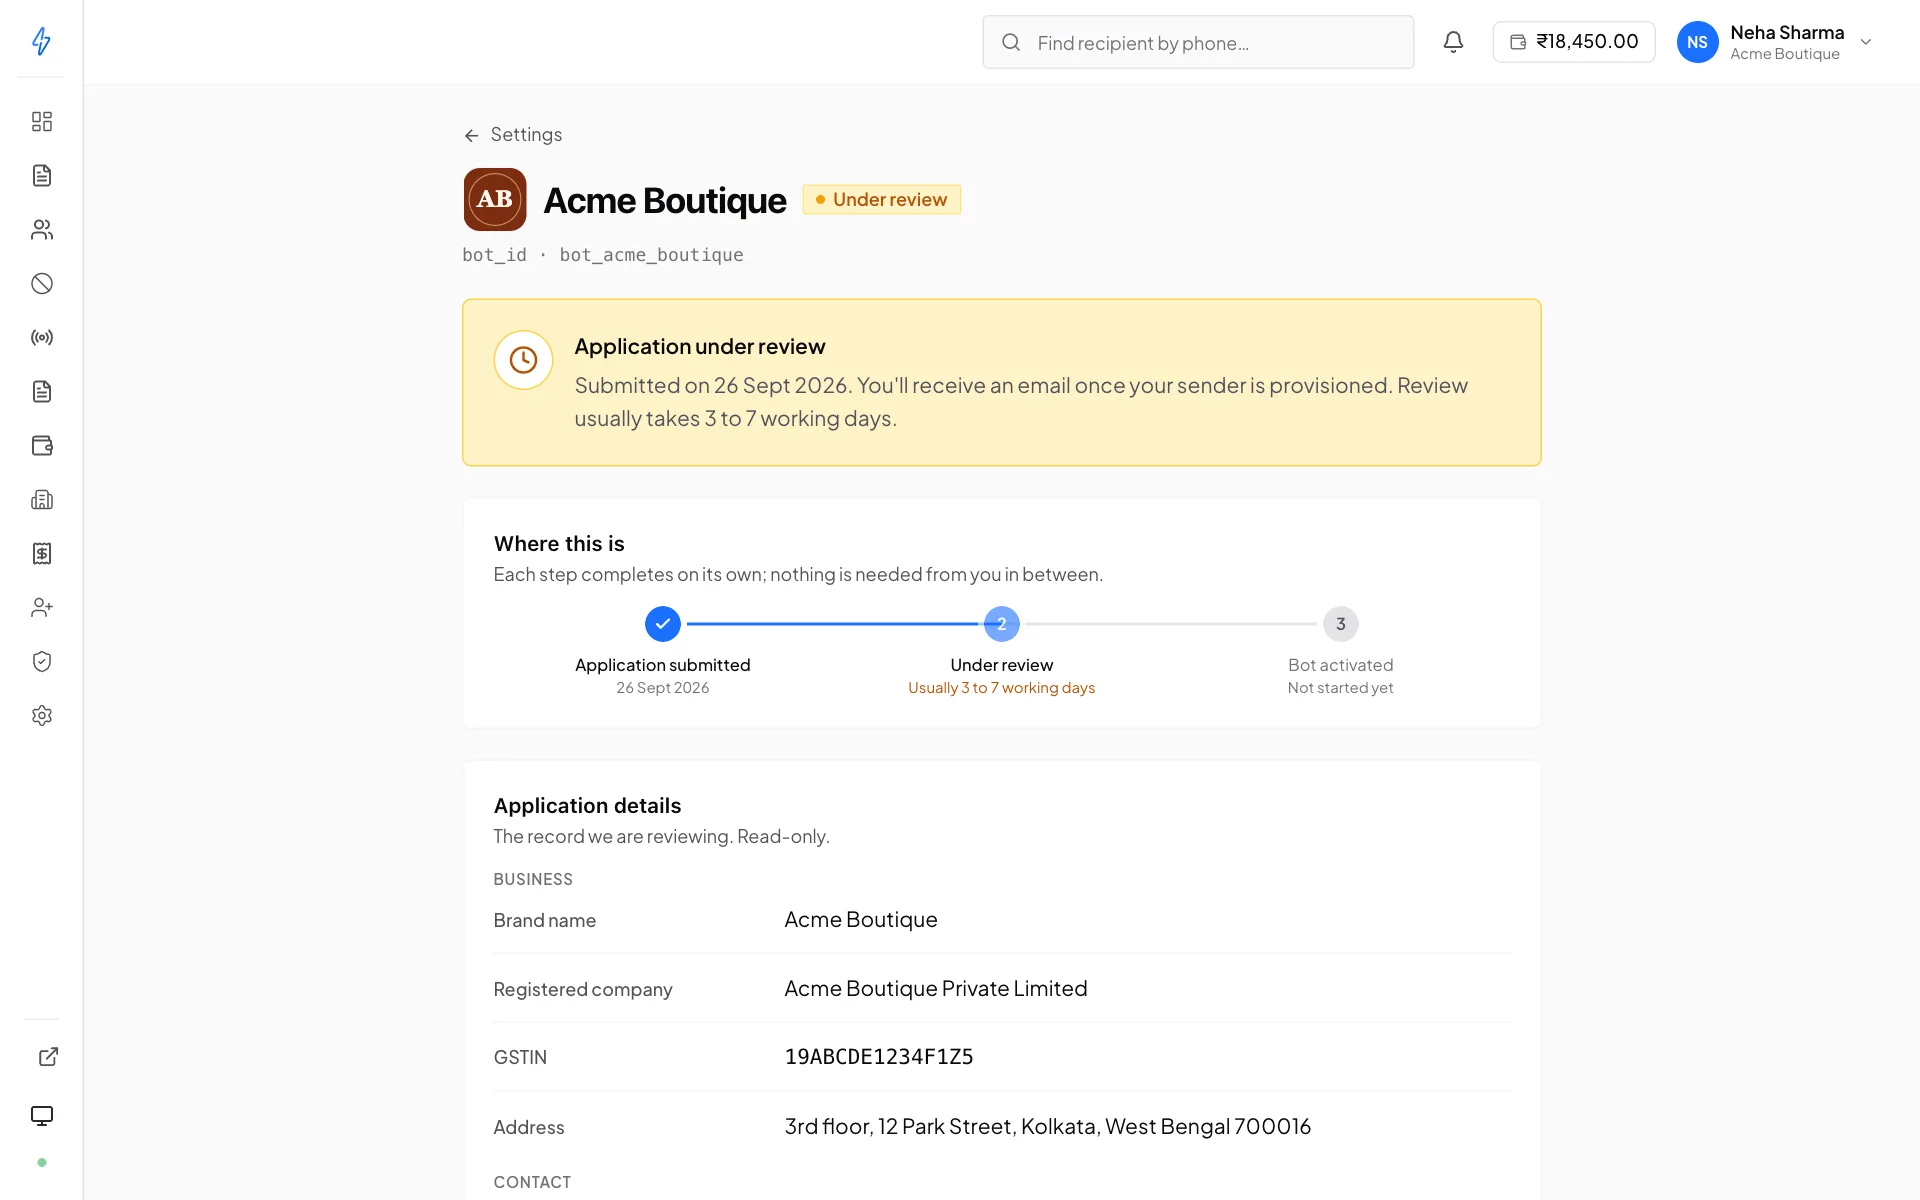
The bot goes through a sequence of states. You can watch it on Settings → Bots, and on the application page itself.
Submitted
We have it. Nothing for you to do. The panel shows an "under review" banner and new broadcasts stay blocked.
Under review
Splashify checks the application, then passes it to the carrier for verification. This is where the days go, usually 3 to 7 working days in total, and the carrier's own step is 48–72 hours once it has everything it needs. See what the carrier asks for below, two of those items involve someone outside Splashify replying to an email, which is the usual reason an application sits longer than it should.
Approved, then activated
Once verified, the bot is activated with its carrier credentials, its TPS budget and its per-message price. Its status flips to
activeand sending unblocks immediately. You get an email.Or: needs changes
A rejection comes back with a stated reason, shown in the panel and emailed to you. Fix what it names and resubmit. You do not start over, and the form reopens with your answers intact.
Or: rejected
Some applications cannot be approved however they are worded, for example a brand the carrier has suspended. Those are rejected for good: the reason is shown the same way, but there is no Update and resubmit. If you think it is a mistake, contact support.
What the carrier checks
Splashify's review is the first gate. The second is the carrier's, and it asks for things the form itself does not collect, which is why an application can be "submitted" and still need something from you.
- A letter of authorisation from the brand
The carrier emails your brand contact and asks them to reply confirming that they authorise this sender to represent the brand. Nothing progresses until that reply arrives.
- A corporate email address for that contact
A personal address is rejected outright, gmail, outlook, yahoo. It must be on the brand's own domain. This is the single most common cause of a stalled application, and the failure is silent from your side: you see "under review" while an email sits unanswered in someone's inbox.
- How you obtain opt-in
Not a description, evidence. A link to the form or checkout page where a customer gives their number, and where it says they consent to messages from you. A screenshot if the page is behind a login.
- What triggers your messages
The actual events: a signup, a purchase, an order-status change, an appointment reminder, a campaign you run. "Marketing" is not an answer that passes.
- What the conversation looks like
Whether it is one-way or two-way, and where any links go.
- What you send when someone opts out
Your STOP confirmation wording, and what the bot does afterwards. Splashify handles the behaviour automatically. You own the wording. Auto-replies →
- A short demo video
A recording of the bot actually messaging someone, hosted somewhere publicly reachable, with the link supplied. It must match the declared use case, promotional content in a transactional application is refused.
Line up the brand contact before you submit
Tell them the email is coming, and check the address is on the company domain. An application waiting on a colleague who has not noticed the request is indistinguishable, from the panel, from one still being reviewed.
Once approved, the bot gets a verified shield next to its name in the recipient's conversation. That badge is the whole point of the process. It is what tells a customer the message is genuinely from you.
Common rejection reasons
While you wait
Do everything that does not need an active bot:
- Build and submit templates. They can be created against a pending bot and reviewed in parallel
- Import your contact lists
- Set up your billing profile and top up the wallet
- Invite your team
- Configure webhooks and API keys
The only thing that stays blocked is sending.
Applying for additional bots
Once you have one bot, you can apply for more, a second brand, a separate promotional sender, a regional identity. Each goes through the same form and the same review, and each gets its own TPS and price. The wallet is shared; every bot draws from the same balance.